

How to measure jacket size
Table of Contents
Display
When I measure jacket size, I always start with a flexible measuring tape and record every number in inches for accuracy. I focus on key areas: chest, waist, hips, shoulders, sleeves, and jacket length. I check each measurement twice and compare them to an international sizing chart. Sizing letters like S, R, and L help me select the right jacket length. I encourage anyone to follow these tips for making measurements to ensure a comfortable and confident fit.
Key Takeaways
Use a flexible measuring tape for accurate measurements. Avoid rigid tapes that can distort results.
Always measure key areas: chest, shoulders, sleeves, waist, hips, and jacket length. Each measurement is crucial for a proper fit.
Wear light clothing when measuring. Bulky layers can add extra inches and lead to incorrect sizing.
Double-check your measurements. Taking each measurement twice helps ensure accuracy and prevents sizing errors.
Record your measurements immediately. Keeping clear notes helps you compare with sizing charts and avoid confusion later.
Consider fit preferences when choosing a jacket. Decide between slim, regular, or relaxed fits based on your style and comfort needs.
Get help from a friend for difficult measurements. Assistance can improve accuracy, especially for shoulders and sleeves.
Always check the return policy before purchasing. Knowing you can return or exchange a jacket reduces the risk of sizing mistakes.
Measure Yourself for a Jacket
When I measure jacket size, I always begin by preparing my space and gathering a flexible measuring tape. I make sure to wear light clothing because thick layers can distort my results. Taking measurements with minimal clothing helps me find my best fit and ensures my jacket size reflects my true body shape.
Chest
Tape Position
I stand upright and relax my arms at my sides. I wrap the measuring tape around the fullest part of my chest, usually just under the armpits and across my shoulder blades. I keep the tape level and snug, but not tight. Measuring your body in this way gives the most accurate chest measurement.
Tip: Ask a friend to help hold the tape straight across your back. This prevents errors and makes taking measurements easier.
Record in Inches
I always record my chest measurement in inches. Consistency matters, so I double-check the number and write it down immediately. This step is crucial when I compare my results to sizing charts and try to find my best fit.
Shoulders
Across Shoulder Points
For shoulder width, I measure from the tip of one shoulder straight across my back to the tip of the other shoulder. I keep the tape flat and horizontal. This step helps me understand how the jacket will sit across my frame. Measuring your body at the shoulder points is essential for a tailored look.
Measurement Area | Instructions |
|---|---|
Shoulder | Measure from the tip of one shoulder, across your back to the tip of your other shoulder. |
Chest | Measure the circumference around the fullest area of chest. |
Sleeves
Arm Position
I bend my arm slightly at the elbow. I start the tape at the shoulder seam and run it down to the tip of my wrist. This method ensures my sleeve length matches my natural arm position. Taking measurements with my arm bent gives a more comfortable fit and prevents sleeves from riding up.
Note: I always measure both arms and use the longer measurement. This helps me find my best fit, especially if my arms are slightly different lengths.
Measurement Area | Instructions |
|---|---|
Sleeve Length | Measure from your shoulder seam, with your arm slightly bent, to the tip of your wrist. |
When I measure yourself for a jacket, I focus on accuracy and consistency. I avoid bulky clothes and use a flexible tape. I record every chest measurement and waist measurement in inches. Taking measurements carefully helps me measure jacket size correctly and makes it easier to find my best fit.
Waist
Natural Waist
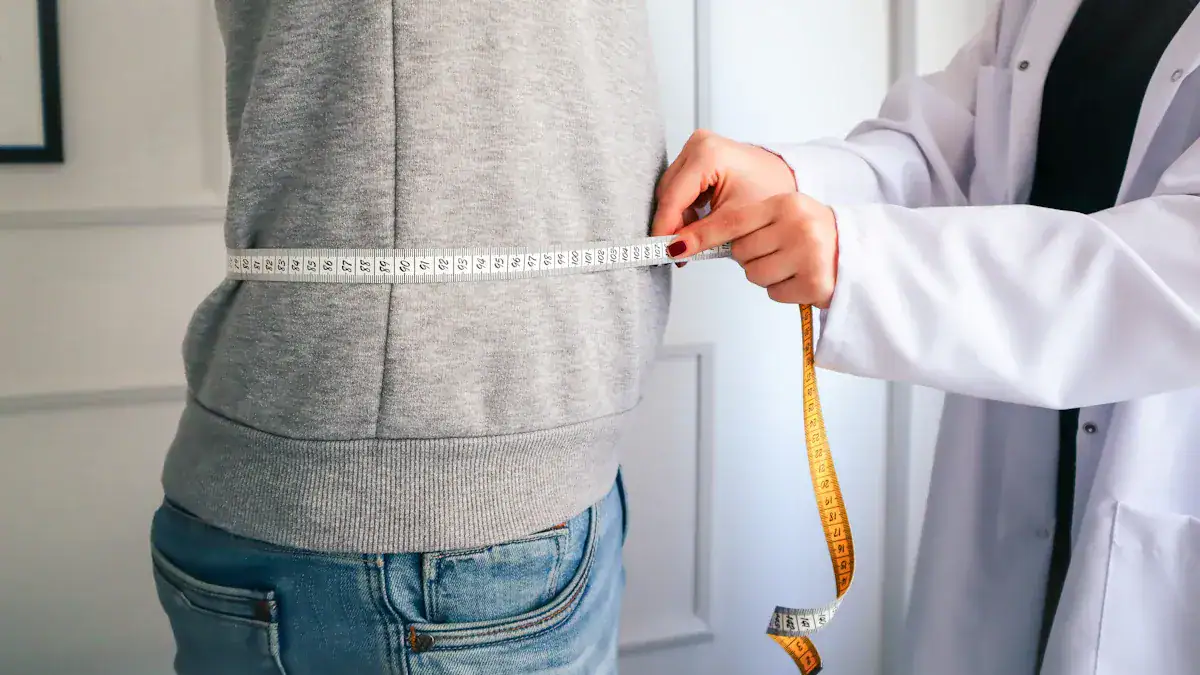
I always measure my natural waist to get the most accurate body measurements. I stand up straight and relax my stomach. I find the narrowest part of my torso, usually just above my belly button and below my rib cage. I wrap the measuring tape around this area, keeping it parallel to the floor. I make sure the tape feels snug but not tight. I record the number in inches right away.
Tip: I avoid sucking in my stomach or wearing bulky clothing. This helps me get a true measurement for my jacket size.
I double-check the waist measurement to ensure accuracy. I write down the number and compare it with other body measurements. This step helps me select a jacket that fits comfortably around my midsection.
Hips
Standing Position
I measure my hips by standing with my feet together. I locate the fullest part of my hips, which is usually around the seat area. I wrap the tape measure around this spot, making sure it stays level and straight. I keep the tape snug but do not pull it too tight.
I always record my hip measurement in inches. I check the number twice and write it down with my other body measurements. This process helps me find a jacket that allows for easy movement and a flattering fit.
Measurement Area | How I Measure | Why It Matters |
|---|---|---|
Waist | Around the natural waist, parallel to the floor | Ensures the jacket fits comfortably at the midsection |
Hips | Around the fullest part of the hips, feet together | Helps select a jacket that allows for movement |
Jacket Length
Shoulder to Hem
I measure jacket length by starting at the top of my shoulder, right next to the base of my neck. I run the tape measure straight down the front of my body to the point where I want the jacket to end, usually at the bottom of my hips or just below. I keep the tape flat against my body for the most accurate result.
I always record jacket length in inches. I double-check this measurement because jacket length affects the overall look and comfort of the jacket. I compare my jacket length with sizing charts to make sure I choose the right style for my height and body shape.
Note: I use all my body measurements together when I measure jacket size. This method helps me find a jacket that fits well in every area, from the shoulders to the hem.
I recommend getting help from a friend for these steps. Accurate body measurements make it easier to measure jacket size and select the best jacket length for any occasion.
How to Measure a Jacket
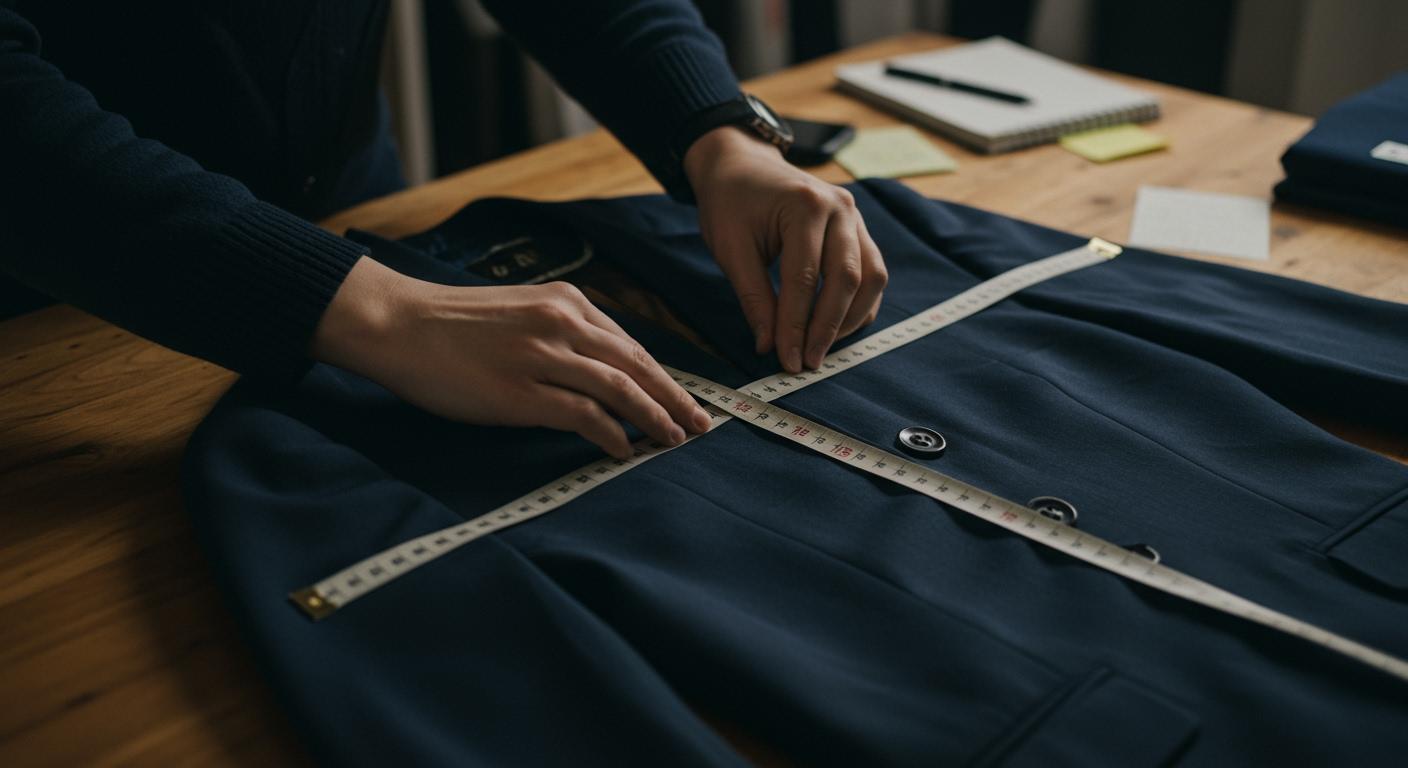
When I want to measure jacket size using an existing jacket, I always start by laying the garment flat on a clean, wrinkle-free surface. This step ensures every measurement is accurate and consistent. I follow a systematic approach for each area, using a soft measuring tape and recording results in inches.
Chest Width
Flat Surface
I place the jacket on a flat table or bed, smoothing out any wrinkles. I zip or button the jacket completely so the fabric sits naturally. This preparation helps me avoid errors that come from uneven surfaces or bunched material.
Armpit to Armpit
To measure the chest width, I locate the points just below each armpit seam. I stretch the measuring tape from one armpit to the other, keeping it straight and parallel to the bottom hem. I read the number in inches and write it down immediately. This method gives me the true width of the jacket at its fullest part.
Tip: I always double-check the tape position to make sure it is level. Measuring too high or too low can distort the chest width.
Steps to measure a jacket chest width:
Lay the jacket flat and smooth out wrinkles.
Button or zip the jacket fully.
Place the tape measure under the armpits, from one side to the other.
Record the measurement in inches.
Shoulders
Seam to Seam
For shoulder width, I measure from the outer edge of one shoulder seam straight across to the other. I keep the tape flat and avoid stretching the fabric. This step helps me understand how the jacket will sit across my shoulders. I always check that the jacket is lying perfectly flat before measuring.
Measurement Area | How I Measure | Why It Matters |
|---|---|---|
Shoulders | Seam to seam, straight across the back | Ensures the jacket fits well and sits properly on the shoulders |
Note: Skipping shoulder measurements can cause significant sizing errors. I never ignore this step when I want a tailored fit.
Sleeves
Shoulder to Cuff
To measure sleeve length, I start at the shoulder seam where it meets the sleeve. I run the tape down the outside of the sleeve to the end of the cuff. I keep the tape straight and avoid pulling it too tight. This process helps me find a sleeve length that allows for comfortable movement.
Quick checklist for sleeve measurement:
Start at the shoulder seam.
Measure down to the cuff.
Keep the tape flat and straight.
Record the result in inches.
I always measure both sleeves and use the longer number. This practice accounts for any slight differences and ensures the best fit.
By following these steps to measure a jacket, I avoid common mistakes like measuring over bulky clothing or using a stiff tape. I focus on accuracy and consistency, which makes it easier to compare my results to sizing charts and select the right jacket size. If you want to know how to measure a jacket or how to measure jackets for the best fit, always use a soft tape and lay the jacket flat. These techniques guarantee reliable results every time.
Length
Collar to Hem
When I want to measure the length of a jacket, I always start by laying the jacket flat on a table or bed. I smooth out any wrinkles so the fabric sits naturally. I make sure the collar is straight and the hem is even. This preparation helps me get an accurate measurement.
I place the measuring tape at the seam where the collar meets the body of the jacket. I hold the tape at this point and run it straight down the front of the jacket to the very bottom hem. I keep the tape flat and do not let it twist or curve. I read the number in inches at the hem and write it down right away.
Tip: I always measure along the front of the jacket, not the back. The front measurement gives me the true length as it will appear when I wear the jacket.
I double-check the length to make sure I have the correct number. I compare this measurement with sizing charts to find the best jacket size for my height and style preference. Measuring from collar to hem gives me the information I need to select a jacket that looks balanced and feels comfortable.
Two-Button Jacket
Tape Position
When I measure a two-button jacket, I follow a special step to get the most accurate length. I lay the jacket flat and button both buttons. I find the top button and measure six inches down from it. This spot is where I start my length measurement.
I place the measuring tape at this point, then run it straight down to the bottom hem. I keep the tape flat and make sure it follows the front of the jacket. This method helps me measure jacket size in a way that matches how most brands design their sizing charts.
Note: Starting six inches below the top button gives a more consistent result. Many brands use this method to standardize jacket length across different styles.
I always record the measurement in inches and compare it to the recommended lengths for my height. This step ensures my jacket size matches my body and gives me a professional, tailored look.
By following these steps, I can confidently measure jacket size for any style, including classic two-button jackets. Accurate measurements help me choose a jacket that fits well and looks sharp.
Measure Jacket Size with Sizing Charts
Find Size Chart
When I shop for a new jacket, I always start by finding the brand’s official size chart. Most brands display their sizing guide on product pages or in a dedicated section of their website. I look for charts that show clear measurements for chest, jacket length, and sleeve length. A reliable chart helps me match my body measurements to the right size.
Here’s what I expect to see in a good size chart:
Description | |
|---|---|
Jacket Length | The distance from the base of the collar to the bottom of the jacket. This varies by style. |
Chest Size | The measurement around the fullest part of the chest, taken under the armpits. |
Sleeve Length | The measurement from the shoulder seam to the wrist. This ensures sleeves fit comfortably. |
Tip: I always double-check that the chart uses inches, since I record my measurements that way.
Compare Measurements
After I gather my measurements, I compare them to the sizing guide. I follow a step-by-step process to make sure I select the best fit:
I identify my body type and consider how I want the jacket to fit.
I review the sizing information provided by the brand.
I use a comparison template or table to match my numbers to the chart.
I analyze the data and decide which size aligns best with my measurements.
I finalize my choice by confirming the chart’s details and checking for any notes about fit.
This process helps me avoid mistakes and ensures I choose a jacket that fits well. I always remember that different brands may have slight variations in their charts, so I never skip this step.
Sizing Letters (S, R, L)
When I see sizing letters like S, R, and L, I know they refer to jacket length and sleeve length. Here’s how I interpret them:
S stands for Short. This size works best for people with shorter arms or torsos.
R means Regular. This fits most people with average proportions.
L stands for Long. This size suits taller individuals or those with longer arms.
I often see these letters combined with a number, such as 38R or 42L. The number refers to the chest measurement, while the letter indicates the jacket’s length and sleeve proportion. I always check both parts to make sure the jacket will fit my body shape.
Note: If I plan to wear layers under my jacket, I size up for comfort. I can always tailor the jacket later for a perfect fit.
By following these steps, I use my measurements and the sizing guide to confidently measure jacket size and select the right fit for my needs.
Fit Preferences
When I select a jacket, I always consider my fit preferences before making a final decision. The fit of a jacket changes how it looks and feels. I want my jacket to match my style, body shape, and comfort needs. I use my measurements and the sizing chart as a starting point, but I also think about how I want the jacket to sit on my body.
I usually see three main fit options when shopping for jackets:
Fit Type | Description | Best For |
|---|---|---|
Slim | Tapers closer to the body, narrow sleeves and chest, modern silhouette | Lean builds, sharp appearance |
Regular | Balanced cut, allows movement, classic look | Most body types, everyday wear |
Relaxed | Looser fit, extra room in chest and sleeves, casual and comfortable | Broad frames, layering, comfort |
I always try to match the fit to my intended use. If I want a sharp, tailored look for business or formal events, I choose a slim fit. For daily wear or if I plan to move around a lot, I prefer a regular fit. When I need extra comfort or want to wear sweaters underneath, I go for a relaxed fit.
Tip: I always try on jackets with the type of clothing I plan to wear underneath. This helps me see if the fit allows enough room for layering.
I also pay attention to how the jacket feels in key areas. I check the shoulders first. The seam should sit right at the edge of my shoulder. I make sure the chest and waist feel comfortable when I button or zip the jacket. I move my arms to test the sleeves. If the jacket pulls or feels tight, I know I need a different fit or a larger size.
Sometimes, I find myself between two sizes. In that case, I think about my fit preference. If I want a closer fit, I size down. If I want more room, I size up. I always remember that a tailor can adjust a jacket for a perfect fit, but it is easier to take in a jacket than to let it out.
Here is a quick checklist I use when deciding on fit:
I review the sizing chart and my measurements.
I decide if I want a slim, regular, or relaxed fit.
I consider the type of clothing I will wear underneath.
I try on the jacket and move around to test comfort.
I check the return policy in case I need to exchange for a different fit.
Choosing the right fit makes a big difference in how confident and comfortable I feel in my jacket. I always trust my own comfort and style preferences when making the final choice.
How to Measure Jackets Accurately
Use Measuring Tape
I always start with the right tools when I measure jacket size. A high-quality measuring tape designed for fashion and tailoring gives me the most accurate results. I prefer tapes made of fiberglass because they do not stretch or warp, even after repeated use. Clear, fade-resistant markings on both sides help me read measurements quickly and avoid mistakes.
Fiberglass tapes stay true to length and do not stretch.
Markings on both sides make it easy to measure from any angle.
Fade-resistant numbers ensure I can see the measurements clearly every time.
I lay the tape flat against the jacket or my body, making sure it follows the correct path for each measurement. I avoid using rigid or metal tapes because they do not conform to curves and can give inaccurate results.
Tip: I always check that the tape is straight and level before I record any numbers. This habit helps me avoid errors and ensures my measurements reflect my true size.
Double-Check
I never rely on a single measurement. Double-checking every number is a habit that saves me from costly sizing errors. I measure each area twice and compare the results. If I see a difference, I measure a third time to confirm the correct number.
Accurate measurements prevent sizing errors when buying jackets.
Manufacturers’ sizes often vary, so my own measurements are more reliable than size tags.
Many people do not know their true measurements, which leads to confusion and poor fit.
I always trust my tape and my process over the label inside a jacket. By double-checking, I catch mistakes before they affect my purchase. I write down each measurement immediately and review my notes before I order or tailor a jacket.
Note: I never skip this step. Double-checking takes only a few extra minutes but can save me from returns and exchanges.
Get Help
Measuring alone can be tricky, especially for areas like shoulders and sleeves. I ask a friend or family member to help me keep the tape taut and level. Their assistance makes a big difference in accuracy.
A helper keeps the tape straight across my back and shoulders.
Getting help improves accuracy for difficult areas such as shoulder width and sleeve length.
Assistance ensures the tape does not sag or twist, which is crucial for precise measurements.
I find that teamwork leads to better results. My helper reads the tape while I hold it in place, or vice versa. This method works especially well for longer measurements, like jacket length or arm span.
Tip: I always choose someone who pays attention to detail. Their careful approach helps me get the best possible fit.
Record Clearly
I always make recording my measurements a top priority when I measure jacket size. Accurate notes help me avoid confusion and ensure I select the right jacket every time. I use a dedicated notebook or a digital note-taking app to keep all my numbers in one place. This habit saves me time and prevents mistakes when I compare my measurements to sizing charts.
I follow a simple process to record each measurement:
I write down the measurement immediately after I take it.
I label each number with the specific area, such as “Chest,” “Shoulders,” or “Sleeve Length.”
I include the date, especially if I expect my size to change over time.
I double-check that I have recorded the unit of measurement, usually inches.
Tip: I never rely on memory. Writing down each number right away keeps my records accurate and reliable.
I organize my notes in a clear table for quick reference. Here is an example of how I structure my measurements:
Measurement Area | Value (inches) | Date | Notes |
|---|---|---|---|
Chest | 40 | 06/10/2024 | Relaxed, arms down |
Shoulders | 18 | 06/10/2024 | Seam to seam |
Sleeve Length | 25 | 06/10/2024 | Arm slightly bent |
Waist | 34 | 06/10/2024 | Natural waist |
Hips | 38 | 06/10/2024 | Feet together |
Jacket Length | 30 | 06/10/2024 | Shoulder to hem |
I update this table whenever I retake my measurements. If I try on jackets at a store, I bring these notes with me. This approach helps me compare different brands and styles without second-guessing my numbers.
Sometimes, I use my phone to snap a quick photo of the measurement as I take it. This visual record acts as a backup and helps me verify my notes later. I also save screenshots of sizing charts from my favorite brands. Keeping all this information together makes shopping much easier.
Note: Consistency matters. I always use the same method and tools each time I measure. This practice ensures my records stay accurate and comparable.
I avoid abbreviations or unclear labels in my notes. Clear, detailed records help me communicate with tailors or customer service if I need adjustments or have questions about fit. When I order online, I copy my measurements directly from my notes to the order form.
Recording measurements clearly gives me confidence. I know I can trust my numbers and make informed decisions. This step may seem simple, but it makes a big difference in finding a jacket that fits perfectly.
Common Mistakes
Bulky Clothing
I always avoid measuring over bulky clothing. Thick sweaters, hoodies, or layered shirts can add extra inches to my measurements. This leads to jackets that feel loose and look oversized. I learned early on that even a lightweight sweatshirt can distort the numbers. For the most accurate results, I wear a thin t-shirt or measure directly over my undergarments. This approach gives me a true sense of my body’s shape and ensures the jacket fits as intended. I also remind myself to empty my pockets and remove accessories like belts or watches before measuring. These small steps help me avoid unnecessary errors.
Tip: I recommend standing in front of a mirror while measuring. This helps me check that the tape sits flat and straight, especially when I measure alone.
Rigid Tape
Using a rigid tape measure is a mistake I never make twice. I discovered that a stiff tape cannot follow the natural curves of my body or the contours of a jacket. This results in inaccurate numbers and a poor fit. I always choose a flexible measuring tape for every measurement. Here’s why:
A flexible tape curves around my chest, waist, and hips, giving me precise numbers.
It allows me to measure sleeves and shoulders without gaps or bunching.
The tape sits flat against the fabric, which prevents overestimating or underestimating the size.
I keep a tailor’s tape in my drawer for this reason. It makes the process smoother and the results more reliable. I never use a metal tape or a construction tape measure for clothing. These tools simply do not provide the accuracy I need for a well-fitting jacket.
Guessing
Guessing my jacket size has always led to disappointment. When I skip measuring and rely on my memory or past purchases, I often end up with jackets that do not fit well. I have experienced discomfort and restricted movement from jackets that are too tight. Sometimes, I notice shoulder divots or collar gaps when the fit is off. An oversized jacket sags and looks sloppy, while a tight one pinches and limits my range of motion. These issues not only affect how I feel but also how I look. A jacket that does not align with my body’s contours never looks sharp or professional.
Note: I always take the time to measure before buying a new jacket. This simple habit saves me from costly returns and ensures I feel confident in my appearance.
Ignoring Fit
I have learned that ignoring fit is one of the most common mistakes people make when measuring for a jacket. Many shoppers focus only on the numbers—chest, waist, and sleeve length—without thinking about how the jacket should actually look and feel on the body. I used to believe that as long as I matched my measurements to a size chart, I would get a perfect fit. In reality, fit involves more than just numbers.
Fit determines how comfortable and confident I feel in my jacket. A jacket that fits well follows the natural lines of my body. It allows me to move my arms freely and sit down without feeling restricted. When I ignore fit, I often end up with jackets that look boxy, sag at the shoulders, or pull across the chest. These issues make even the most expensive jacket look awkward.
I always check these key areas for fit:
Shoulders: The seam should sit right at the edge of my shoulder. If it hangs over or sits too high, the jacket will never look sharp.
Chest and Waist: I make sure I can button the jacket comfortably. I avoid jackets that pull or create wrinkles across the front.
Sleeve Length: The cuff should end at my wrist bone. Sleeves that are too long or short ruin the overall appearance.
Jacket Length: The hem should cover my seat and fall in line with my hand when my arms hang down.
Tip: I always try on the jacket with the type of clothing I plan to wear underneath. This helps me see if the fit allows for layering or if I need to size up.
Ignoring fit can also lead to discomfort. I have worn jackets that looked good on the hanger but felt tight when I moved. Sometimes, the armholes cut into my underarms or the back felt too tight when I reached forward. These problems distract me throughout the day and make me regret my purchase.
To avoid this mistake, I always:
Move my arms and shoulders when trying on a jacket.
Sit down and stand up to check for pulling or bunching.
Look in the mirror from all angles.
Ask for a second opinion if possible.
I remind myself that a tailor can adjust many aspects of a jacket, but some fit issues cannot be fixed. I never settle for a jacket that does not feel right. Paying attention to fit ensures I look polished and feel comfortable every time I wear my jacket.
Between Sizes
Size Up or Down
When I find myself between two jacket sizes, I always take a careful approach. I know that sizing up is usually the safest choice. A slightly larger jacket gives me more flexibility, especially if I plan to wear layers underneath. I pay close attention to the fit in the shoulders. This area matters most for a professional look and comfort. If the shoulders fit well, I can adjust other parts of the jacket more easily. I avoid choosing a smaller size because a tight jacket restricts movement and creates visible pulling across the back. I want my jacket to look clean and feel comfortable, so I never settle for a size that feels too snug.
Tip: I always try on both sizes if possible. I move my arms and check for any tightness or bunching, especially across the upper torso. If I see horizontal wrinkles or feel restricted, I know the jacket is too small.
Here is a quick checklist I use when deciding between sizes:
Try on both sizes and check shoulder fit first.
Move your arms to test comfort across the back.
Choose the larger size if you plan to layer clothing.
Avoid jackets that feel tight or show pulling.
Tailoring
I rely on tailoring to achieve the best fit when I fall between standard sizes. Off-the-rack jackets often leave gaps or feel tight in the wrong places. A skilled tailor works with my body, not against it. Tailoring allows for precise adjustments in the shoulders, chest, and sleeves. I notice that tailored jackets enhance comfort and create a polished appearance. Mass-produced garments rarely match my proportions perfectly, so I invest in tailoring to avoid awkward bunching or sagging.
“Jacket tight across the back creates visible pulling and bunching that signals insufficient fabric across the upper torso, restricting movement and creating an uncomfortable wearing experience. When a jacket lacks adequate surface area across the back, the fabric stretches and creates horizontal wrinkles that destroy the garment’s clean lines and professional appearance.”
Tailoring transforms a jacket from generic to personalized. I feel confident knowing my jacket fits my body shape and allows for easy movement. I recommend tailoring for anyone who wants a professional look and maximum comfort.
Return Policy
I always check the return policy before buying a jacket, especially when I am unsure about sizing. Most retailers allow returns or exchanges within 30 days, as long as the item remains in its original condition. I keep all tags attached and avoid wearing the jacket outside until I am sure about the fit. If I need to return or exchange, I contact customer service right away.
Product size is a key factor and major reason for returns, especially in the fashion industry. 70% of customers report returning products due to size or fit issues.
I know that size and fit issues account for more than half of all online apparel returns. I read the store’s guidelines carefully and look for recommendations about “true fit.” Some brands offer advice based on my usual size in other labels, which helps me make a better decision. I always keep my measurements handy and compare them to the sizing chart before placing an order.
Return Policy Checklist:
Review the retailer’s return window (usually 30 days).
Keep the jacket in original condition with tags attached.
Contact customer service promptly if a return is needed.
Use sizing guides and “true fit” recommendations to minimize returns.
By following these steps, I make sure I get a jacket that fits well or can be exchanged easily if needed.
When I measure jacket size, I always follow these steps for accuracy:
Use a flexible tape to record key measurements for chest, shoulders, sleeves, neck, and waist.
Lay my favorite jacket flat and compare key measurements to sizing charts.
Double-checking my numbers gives me confidence and ensures a proper fit. Wearing a perfectly fitted jacket improves my posture and boosts my self-perception. I enjoy knowing my jacket communicates professionalism and attention to detail.
FAQ
How do I know if my jacket fits correctly?
I check the shoulder seams. They should sit at the edge of my shoulders. I button the jacket and move my arms. If I feel comfortable and see no pulling or sagging, the fit works for me.
What should I do if my measurements fall between sizes?
I choose the larger size for comfort. I prefer extra room for layering. I visit a tailor if I want a more precise fit. I always check the store’s return policy before buying.
Can I measure myself without help?
I measure myself alone for most areas. For shoulders and sleeves, I ask a friend to help. Accurate measurements require a straight tape and proper positioning. I use a mirror to check tape placement.
Do jacket sizes differ between brands?
I notice that brands use different sizing charts. I always compare my measurements to each brand’s chart. I never rely on my usual size alone. I read product descriptions for fit notes.
How often should I update my measurements?
I update my measurements every six months. I retake them after weight changes or before buying a new jacket. I keep my records current to ensure the best fit.
What is the difference between slim, regular, and relaxed fits?
Fit Type | Description |
|---|---|
Slim | Tapered, close fit |
Regular | Classic, balanced |
Relaxed | Loose, extra room |
I choose the fit based on my style and comfort needs.
Can I use a metal tape measure for jackets?
I avoid metal tape measures. They do not bend around my body or jacket. I use a flexible tailor’s tape for accurate results. This tool gives me reliable numbers every time.