

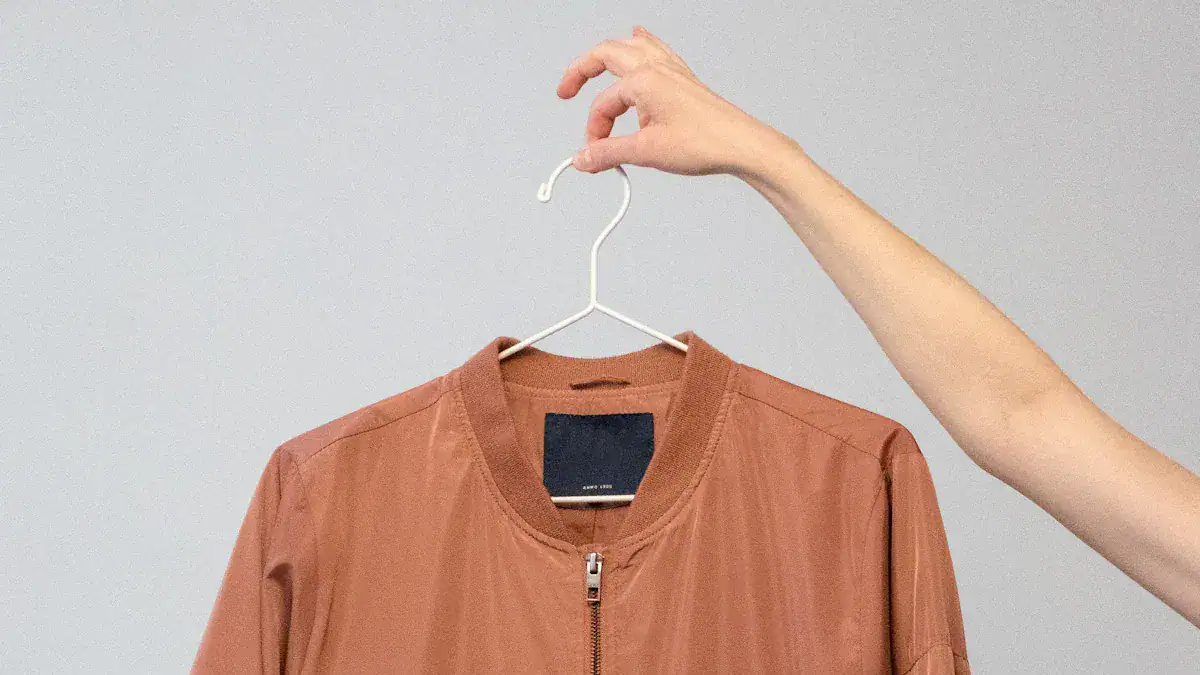
Choose sizes easily for your perfect custom jacket fit
Table of Contents
Display

When I want to choose sizes for a custom jacket, I always start with accurate measurements. I find that using precise numbers for my chest, shoulders, and sleeves gives me the best fit and comfort. Accurate measurements determine how well the jacket sits on my frame and shape the overall look. If I overlook this step, I risk ending up with a jacket that feels tight or looks awkward. I know that understanding my fit preferences also matters. With the right approach, I can make this process straightforward and stress-free every time.
Key Takeaways
Start with accurate measurements for the best custom jacket fit. Measure your chest, waist, hips, shoulders, and arm length carefully.
Use a soft measuring tape and double-check each measurement. This ensures accuracy and helps avoid sizing mistakes.
Understand your fit preferences—slim, regular, or relaxed. Choose a style that matches your comfort needs and body type.
Always consult the brand’s size chart before ordering. Sizes can vary between brands, so compare your measurements to avoid errors.
If you fall between sizes, consider your layering needs. Size up for comfort or down for a tailored look, depending on your preference.
Take advantage of virtual fitting tools. These can help visualize how a jacket will fit before you place your order.
Communicate clearly with customer support or your tailor. Provide detailed measurements and fit preferences for the best results.
Avoid common sizing mistakes by following a careful process. Double-check measurements, read brand guidelines, and ask for help if needed.
Gather Measurements
Accurate measurements form the foundation for choosing the right sizes for a custom jacket. I always start with the right tools and a systematic approach to ensure my jacket fits perfectly. Here’s how I handle each key area:
Tip: I always use a soft measuring tape and double-check each measurement for accuracy. Sometimes, I also provide my height and weight if the size guide requests it.
Chest
Circumference
Getting the chest measurement right is essential for selecting the best sizes. I follow these steps:
I stand upright with my arms relaxed at my sides.
I wrap the measuring tape around the fullest part of my chest, usually just under my armpits and across my shoulder blades.
I make sure the tape stays level and snug, but not too tight. I can fit a finger between the tape and my body.
I record the measurement in inches or centimeters.
I take this measurement while wearing a shirt or thin layer I would typically wear under a jacket.
This method ensures I have the correct chest size, which helps me compare my numbers to the available sizes on the chart.
Point-to-point
For a custom fit, I also measure the distance from one shoulder point to the other across my chest. This point-to-point measurement helps me find sizes that match my frame and prevent tightness or sagging in the jacket’s upper body.
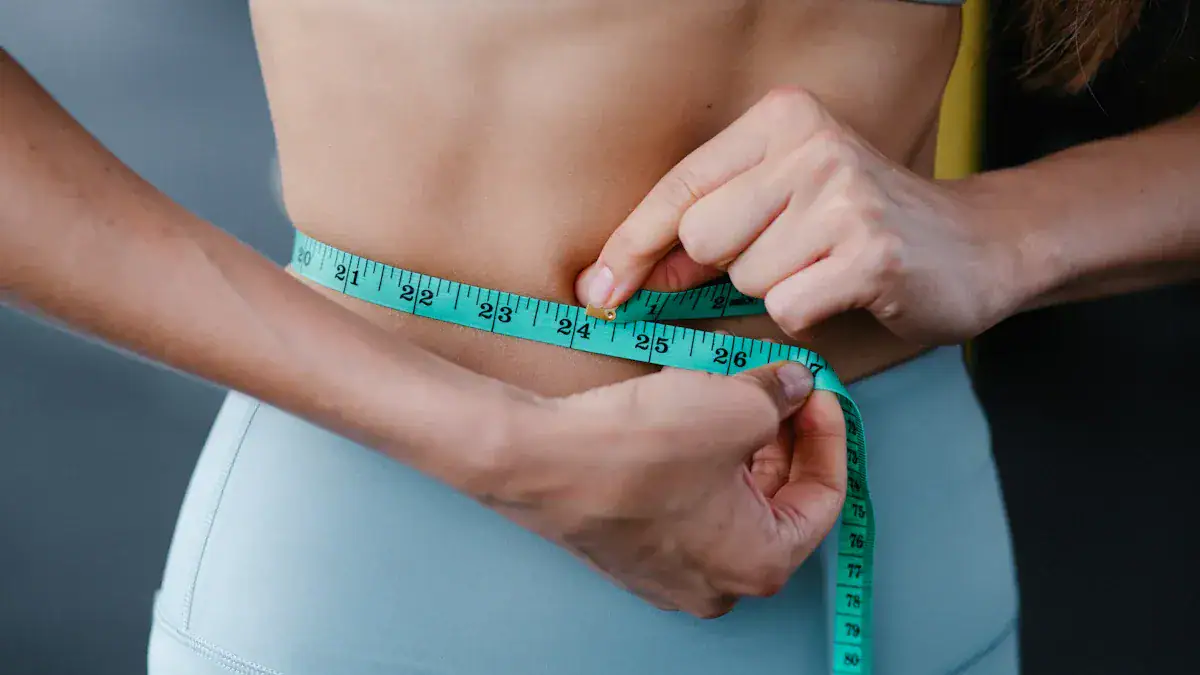
Waist
I know that the waist measurement is just as important as the chest when choosing sizes. Here’s my process:
I identify my natural waistline, usually just above my belly button. I bend to one side to find the natural crease.
I measure at the level of my belly button, as this is often the broadest part.
I keep the tape snug but not tight, allowing for one finger’s allowance.
Accurate waist measurements help me achieve a “second skin” fit. I always consider both chest and waist sizes to ensure the jacket contours to my body without feeling restrictive.
Hips
When I want a jacket that fits well around my hips, I follow these steps:
I determine the width by measuring from my natural waist to about three inches below my crotch level.
I wrap the tape measure around my body at the largest circumference of my hips.
I make sure the tape hangs straight and does not pull too tight.
I multiply the largest circumference by 1.2 if I need to calculate the band length for a more tailored fit.
Note: I sometimes use a band with marked measurements for extra accuracy, especially if I want a very precise fit in the hip area.
Tools for Accurate Measurements
I rely on several tools and methods to get the most accurate sizes for my custom jacket:
Tool/Method | Description |
|---|---|
Provides precise readings and digital images of my body for accurate measurements. | |
AI Enhancement Tools | Interprets my body shape and size quickly, allowing for personalized fitting and real-time editing. |
Wearable Measurement Devices | Records real-time data through advanced technology, making measurements convenient and precise. |
I also find it helpful to take body images from the front, back, and both sides. This gives a better understanding of my body structure and helps me select the right sizes.
By following these steps and using the right tools, I make sure my measurements are spot-on. This attention to detail makes it much easier to choose sizes that result in a custom jacket with a perfect fit.
Shoulders
Measuring my shoulders accurately is essential for a custom jacket that fits well across the upper body. I always start by identifying the acromion bones at the top of each shoulder. These are the bony points where the shoulder meets the arm. I use a soft measuring tape and follow a precise process:
I stand upright and relax my shoulders.
I locate the acromion bone on one shoulder, then find the same point on the other side.
I place the tape measure at the outer edge of one acromion bone and stretch it straight across to the other.
I make sure the tape stays level and does not dip or curve.
I avoid pulling the tape too tightly, as this can compress my shoulders and give a smaller measurement than my true width.
I never pull the tape measure too tight against my body. This can compress my shoulders and lead to an inaccurate measurement.
Sometimes, I measure the shoulder width on a jacket that fits me well. I lay the jacket face down, smooth it out, and measure from the shoulder seam where it meets the sleeve on one side to the same point on the other side. This method helps me double-check my numbers.
Step | Description |
|---|---|
1 | Lay the jacket face down and smooth it out. |
2 | Measure from the shoulder seam where it meets the sleeve on one side to the same point on the other side. |
By following these steps, I ensure my custom jacket will sit perfectly across my shoulders, providing both comfort and a sharp silhouette.
Arm Length
Getting the arm length right is crucial for both comfort and appearance. I always measure my arm with a slight bend at the elbow to mimic natural movement. Here’s how I do it:
I stand with my arms relaxed at my sides and bend my elbow slightly.
I place the end of the tape at the top of my shoulder, right where the sleeve will start.
I run the tape down along the outside of my arm, over the elbow, and stop at the base of my thumb, where it meets my wrist.
I avoid measuring with a completely straight arm, as this can result in sleeves that are too short.
I also avoid an exaggerated bend, which can make the sleeves too long.
The sleeve should fall to the base of my thumb, where it meets my wrist. This allows for a natural drape and prevents the sleeve from riding up when I move.
Sometimes, I place my hand on my hip with my arm bent at a 90-degree angle and measure from the top of my shoulder down to my wrist. This method helps me get a consistent and comfortable sleeve length every time.
Jacket Length
Choosing the right jacket length shapes the overall look and ensures the jacket flatters my proportions. I use a few reliable methods to determine the best length for my body:
I use the ‘cupped fingers’ method. I let my arms hang naturally at my sides and curl my fingers. The bottom of the jacket should reach where my fingers naturally curl.
I measure from the top of my shoulder, near the base of my neck, straight down to the point where I want the jacket to end.
I check that the jacket length is about half the distance from the base of my neck to the ground. This keeps the proportions balanced and classic.
I also measure from the shoulder to the thumb knuckle for a more tailored look.
I always double-check my jacket length measurement to make sure it matches my style preference—whether I want a modern cropped look or a traditional longer fit.
By taking the time to measure my shoulders, arms, and jacket length carefully, I set the foundation for a custom jacket that fits perfectly and looks sharp from every angle.
Choose Sizes
Choosing the right sizes for a custom jacket starts with understanding how to read and interpret a size chart. Every brand offers its own sizing standards, so I always review the chart before I make any decisions. I look for clear measurement ranges, especially for chest, waist, and hips. Many brands provide options from XS up to 6XL, but the actual measurements behind these labels can vary widely.
Size Chart
When I want to choose sizes, I never rely on just the letter or number. I always compare my measurements to the brand’s specific chart. For example, Timberland Pro and Dickies both offer extended sizing, but their chest measurements for XL and 2XL differ. Some brands, like Wrangler, split their sizing into Regular and Tall, while others, such as Carhartt, go up to 6XL. I find it helpful to review a comparison table to see how these brands stack up:
Brand | Size Range (Chest in inches) | Notes |
|---|---|---|
Timberland Pro | XL: 46-48, 2XL: 50-52 | Standard US men’s size until L |
Dickies | 2XL: 46-48, 5XL: 62-64 | Sizes from S to 5XL |
Wrangler | Regular: S (38-40) to 3XL (54-56), Tall: MT (38-40) to 4XT (58-60) | Divided into Regular and Tall categories |
Helly Hansen | XS: 36, 3XL: 75.5-77 | Includes various body measurements |
Caterpillar | L: 42-44, XL: 46-48 | Starts from XS to 2XLT |
The Jacket Maker | XS: 33-34, 4XL: 47-48 | Standard sizes with slight increases |
Carhartt | XS: 34-36, 6XL: 66-68 | Multiple varieties with size variations |
The North Face | XS: 31-32, 3X: 51-53 | Adapts standard measurements until 2XL |
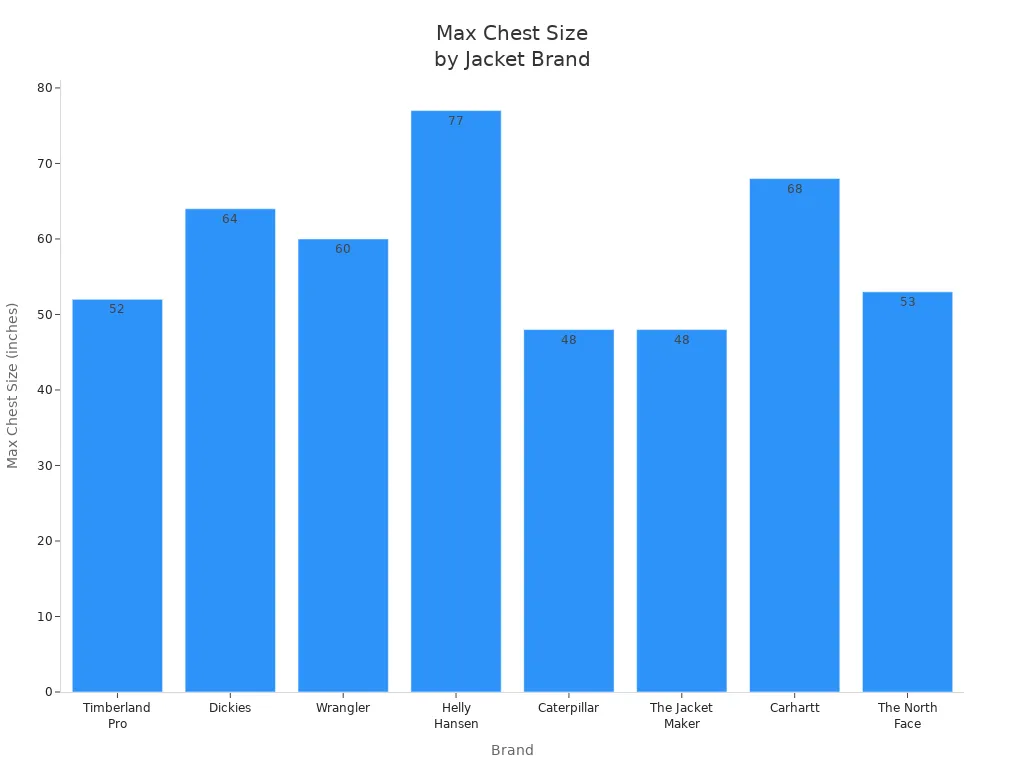
I always check these ranges before I choose sizes, because a 2XL in one brand might fit like a 3XL in another. This step helps me avoid sizing mistakes and ensures my jacket fits as expected.
Comparing Measurements
After I gather my measurements, I match them directly to the size chart. I follow a step-by-step process to make sure I choose sizes that will fit my body comfortably:
I measure my chest by wrapping the tape around the fullest part.
I measure my waist at my natural waistline.
I measure my hips at the widest point.
I measure my shoulders from end to end across my back.
I measure my sleeve length from the top of my shoulder to my wrist.
I measure my jacket length from the top of my shoulder to where I want the jacket to end.
I check my neck size at the base.
I compare each measurement to the chart. If my chest falls into a Large but my waist fits a Medium, I consider which area needs more room. I always prioritize the largest measurement to avoid a tight fit. I also think about how I plan to wear the jacket. If I want to layer sweaters underneath, I might choose sizes that allow extra space.
Tip: I always double-check my measurements before I choose sizes. This habit helps me avoid costly sizing errors.
In-Between Sizes
Sometimes, my measurements do not match a single size exactly. I often find myself between two sizes on the chart. When this happens, I have to decide whether to size up or down. If I prefer a looser fit or plan to wear thick layers, I size up. If I want a more tailored look, I size down, but only if the difference is less than an inch.
Different brands handle in-between sizing in unique ways. Some offer half sizes or custom adjustments, while others recommend choosing the larger size for comfort. I always read the brand’s sizing notes carefully. I also check if the brand allows for returns or exchanges, which gives me peace of mind when I choose sizes.
I never assume that all brands use the same sizing standards. I always review the chart and compare my measurements every time I order a new jacket.
Choosing the right sizes for a custom jacket requires careful attention to the size chart, a direct comparison of my measurements, and smart decisions when I fall between sizes. This approach ensures my jacket fits perfectly and matches my style preferences.
Fit Preferences
Slim
When I want a sharp, modern look, I often choose a slim fit for my custom jacket. This style hugs my body and creates a clean, tailored silhouette. I notice that a slim fit jacket trims away excess fabric, which helps define my shape and gives me a polished appearance. Here are some key points I always consider:
A slim fit jacket provides a tailored look that enhances my body’s shape.
The fit must match my body type to avoid discomfort or restricted movement.
Slim fit jackets remove extra fabric, creating a defined silhouette.
Different body shapes need different slim fit variations for the best result.
Understanding my unique body proportions is crucial, because a polished jacket starts with how well it aligns with my shoulders and chest before dropping into the waistline smoothly.
I always check that the jacket fits well across my shoulders and chest before I look at the waist. If the jacket feels too tight or pulls when I move, I know the slim fit may not suit my frame. I also think about what I plan to wear underneath. If I want to layer sweaters or thicker shirts, I might choose a slightly looser slim fit or size up for comfort.
Regular
For most occasions, I find that a regular fit offers the best balance between comfort and style. This fit gives me enough room to move without looking baggy or oversized. I like that a regular fit jacket follows the natural lines of my body but does not cling tightly. It works well for both casual and professional settings.
When I select a regular fit, I can easily wear a shirt or light sweater underneath. The jacket drapes nicely over my frame and allows for a full range of motion. I recommend this fit if you want a classic look that adapts to different activities and dress codes. I also notice that regular fit jackets suit most body types, making them a safe and versatile choice.
Relaxed
Sometimes, I prefer a relaxed fit, especially when comfort is my top priority. A relaxed fit jacket gives me extra space in the chest, waist, and sleeves. I choose this style when I want to layer bulky clothing or need more freedom of movement for outdoor activities.
A relaxed fit does not mean sloppy. I still look for a jacket that sits well on my shoulders and falls cleanly down my body. The extra room helps me stay comfortable during long days or active tasks. I often pick a relaxed fit for travel, work, or casual weekends when I value ease over a tailored look.
By understanding the differences between slim, regular, and relaxed fits, I can choose a custom jacket that matches my comfort needs and personal style.
Style Choices
When I select a custom jacket, I always pay close attention to style details. These choices do more than define the look—they also influence how the jacket fits and feels on my body. I have learned that lapel type and button configuration can change the entire impression of a jacket, from its formality to the way it shapes my frame.
I often start by considering the lapel. The lapel frames my face and sets the tone for the jacket. I use the following table to guide my decisions:
Lapel Type | Description | Impact on Fit and Style |
|---|---|---|
Notch Lapels | Versatile, commonly found on single-breasted suits. | Ideal for office wear and general use. |
Peak Lapels | Bold and formal, often used in double-breasted suits. | Enhances posture and broadens the frame. |
Shawl Lapels | Smooth and strictly formal, reserved for black-tie events. | Conveys a high level of formality. |
When I want a jacket for daily business wear, I choose notch lapels. They give me flexibility and work well in most settings. For special occasions or when I want to look more powerful, I pick peak lapels. They make my shoulders appear broader and help me stand taller. If I attend a formal event, I go for shawl lapels. They add elegance and make the jacket look refined.
Button choices also play a big role in both fit and style. I always think about how many buttons I want and what material suits my needs. Here are some points I consider:
Buttons change the jacket’s silhouette. A single-button jacket creates a sleek, modern line. Two buttons offer a classic look and work for most body types. Three buttons give a more traditional, structured appearance.
The material of the buttons matters. I like Mother of Pearl for a touch of luxury. Horn buttons feel sturdy and add a natural look.
The placement and number of buttons affect how the jacket closes and drapes. More buttons can make the jacket feel snugger, while fewer buttons allow for a looser fit.
I always match my style choices to how I plan to wear the jacket. If I want to layer sweaters underneath, I choose a style with more room and fewer buttons. For a sharp, fitted look, I select a slim lapel and a single button. I also pay attention to details like pocket style and vent placement, since these can change the way the jacket moves with me.
Tip: I never overlook the small details. Lapel width, button spacing, and even the type of stitching can make a big difference in comfort and appearance.
By thinking carefully about lapel and button styles, I ensure my custom jacket not only fits well but also matches my personality and the occasions I attend. These choices help me create a jacket that feels truly my own.
Custom Options
Made-to-Measure
When I want a jacket that fits me perfectly, I choose a made-to-measure service. This process gives me a high level of control over the fit and style. I start with an initial consultation. During this meeting, I discuss my preferences, select fabrics, and have my measurements taken. This step usually takes about 90 minutes. After the first fitting, the tailor creates a nearly finished jacket based on my measurements and design choices.
I return for a second fitting. Here, I try on the jacket and the tailor checks for any issues. If the sleeves feel too long or the shoulders need more structure, adjustments happen at this stage. This fitting takes about 20 minutes. After the tailor makes the final tweaks, I come back for the last try-on and pickup. This step happens about two weeks after the second fitting. The tailor ensures the jacket fits exactly as I want before I take it home.
Step | Description |
|---|---|
Initial Consultation | Discuss design, select fabric, and take measurements (approx. 90 minutes). |
Second Fitting | Try on the nearly-finished jacket and request adjustments (approx. 20 minutes). |
Final Try-On/Pickup | Final fitting to confirm all tweaks before delivery (about 2 weeks after second fitting). |
Tip: I always communicate my preferences clearly during each fitting. This helps the tailor deliver a jacket that matches my expectations.
Adjustments
I often need small changes to get the best fit from my jacket. The most common adjustments include sleeve length and waist suppression. If the sleeves extend past my wrist, I ask the tailor to shorten them. When I want a more fitted look, I request waist suppression. This adjustment shapes the jacket to my body and removes excess fabric around the midsection.
Adjustment Type | Description |
|---|---|
Sleeve Length | Adjusting the length of the sleeves to fit my arms. |
Waist Suppression | Tailoring the waist area for a more fitted look. |
I also ask for tweaks to the jacket’s body length or shoulder width if needed. These changes help me achieve a balanced and comfortable fit. I always try on the jacket after each adjustment to make sure it feels right.
Special Requests
Sometimes, I have unique needs for my jacket. I might want extra room in the chest for layering or a tailored waist for a sharper silhouette. I can request special linings, custom embroidery, or even extra pockets. If I need a longer body or shorter sleeves, I mention this during the consultation. The tailor notes every detail and incorporates these requests into the final design.
The customization process allows me to create a jacket that reflects my style and meets my needs. I find that clear communication with the tailor leads to the best results. By using made-to-measure services, requesting adjustments, and making special requests, I ensure my jacket fits perfectly and stands out from off-the-rack options.
Sizing Mistakes
Common Errors
Over the years, I have seen many people make the same mistakes when ordering custom jackets. I have made some of these errors myself, especially when I first started exploring custom tailoring. Recognizing these pitfalls helps me avoid them and ensures my jacket fits exactly as I want.
Here are some of the most frequent sizing mistakes I have encountered:
Guessing my size instead of taking fresh, accurate measurements.
Ignoring the differences between brands and assuming all sizing charts are the same.
Prioritizing fabric or style over the actual fit, which often leads to disappointment.
Overlooking the importance of layering and not accounting for what I plan to wear underneath.
Leaving tack stitching or sewn-on tags in place, which can affect how the jacket drapes and fits.
Expecting a flawless fit without following the measurement guidelines provided by the brand.
Failing to communicate my fit preferences or specific needs to the tailor.
I have learned that even small oversights, like not removing temporary stitching or tags, can change the way a jacket feels and looks. I always double-check these details before wearing my new jacket.
Prevention
I believe that preventing sizing mistakes starts with a careful and methodical approach. I never rush the process, because I know that a little extra effort at the beginning saves me from frustration later.
To avoid common errors, I follow these steps:
I always use a soft measuring tape and measure each area twice for accuracy.
I read the brand’s measurement guidelines carefully, since each company may have unique instructions.
I ask a friend or family member to help with measurements, which keeps my posture natural and ensures the tape stays level.
I consult with customer service if I have any doubts about how to measure or which size to choose.
I communicate openly with my tailor about my fit preferences, such as extra room for layering or a more tailored waist.
I try on the jacket as soon as it arrives and check for any issues, like sleeve length or shoulder fit, so I can request adjustments if needed.
Prevention Step | Why It Matters |
|---|---|
Double-check measurements | Reduces risk of ordering the wrong size |
Ensures the jacket matches the intended fit | |
Get measurement assistance | Maintains natural body position for accurate results |
Communicate with tailor | Addresses unique fit concerns before production begins |
Tip: I never hesitate to reach out to customer support or my tailor with questions. Clear communication helps me get a jacket that truly fits my needs.
By staying attentive to these details, I consistently achieve a custom jacket fit that matches my expectations. I have found that a thoughtful approach, combined with open communication, makes all the difference in avoiding sizing mistakes.
Get Help
Customer Support
When I feel uncertain about my custom jacket size, I always reach out to customer support. I find that preparing the right information before contacting them makes the process much smoother. I gather my measurements, note my fit preferences, and decide if I want to start from a standard size or create a new one. Sometimes, I consider mailing in a jacket that fits me well so the experts can measure it for me. If I want a more hands-on approach, I schedule a visit to a showroom for in-person assistance.
Here’s what I usually prepare before reaching out:
My most recent body measurements (chest, waist, hips, shoulders, arm length, and jacket length)
My fit preferences (slim, regular, or relaxed)
Whether I want to create a new custom size or modify a standard size
A favorite jacket for reference, if I plan to mail it in
My availability for a showroom appointment, if needed
Tip: I always provide as much detail as possible. This helps the support team recommend the best options for my needs.
Virtual Fitting
I have found virtual fitting tools to be a game-changer in the custom jacket process. These tools let me visualize how a jacket will fit before I place my order. I upload my measurements and sometimes even a photo. The system generates a digital version of the jacket on my body shape. This gives me a clear idea of how the jacket will look and feel.
I noticed several benefits when I used virtual fitting:
Findings | Description |
|---|---|
The fit evaluation for the final virtual jacket improved compared to the first virtual jacket. | |
Customization Requests | I could request changes to the fit, especially if I wanted more room or a different silhouette. |
Consumer Satisfaction | I felt more satisfied with my custom jacket than with any ready-to-wear option. |
Virtual fitting tools allow me to experiment with different styles and sizes. I can see the results instantly, which helps me make confident decisions. I also appreciate that these tools reduce the risk of ordering the wrong size.
Reviews
Before I finalize my custom jacket order, I always read reviews and feedback from other customers. I look for comments about sizing accuracy, comfort, and the overall experience with the brand. Reviews often highlight whether the size chart matches real-life fit or if customers needed adjustments after delivery.
I pay close attention to reviews that mention body type and fit preferences similar to mine. This helps me predict how the jacket might fit me. I also look for photos in reviews, as they show how the jacket looks on different people.
Note: I trust brands that respond to reviews and offer solutions. This shows they care about customer satisfaction and stand behind their products.
By using customer support, virtual fitting tools, and reading reviews, I make sure I get the best possible fit for my custom jacket. These resources give me confidence and help me avoid common sizing mistakes.
I always start by gathering precise measurements and reviewing fit preferences. I consult size charts and seek expert advice for a superior fit. I rely on available resources to boost my confidence in every order.
Resource | Benefit |
|---|---|
Customer Support | Real experts review each order for accuracy |
Alterations Coverage | Tweaks up to $50 covered, ensuring satisfaction |
Custom jackets tailored to my body shape feel more comfortable than off-the-rack options.
Virtual try-on technology reduces return rates by up to 30%.
I trust this process and confidently order custom jackets that fit perfectly every time.
FAQ
How do I know if my measurements are accurate?
I always double-check each measurement with a soft tape. I ask a friend to help for tricky spots like shoulders. I compare my numbers to a well-fitting jacket for extra confidence.
What should I do if I fall between two sizes?
I usually size up for comfort, especially if I plan to layer. I check the brand’s return policy before ordering. I also contact customer support for advice.
Can I adjust my custom jacket after receiving it?
Yes, I often request minor alterations like sleeve or waist adjustments. Many brands offer alteration credits or recommend local tailors. I keep my receipt and communicate changes clearly.
How do I choose the right fit style for my body type?
I try on different fits—slim, regular, relaxed—to see what flatters my shape. I consider how I want to wear the jacket. I ask for expert advice if I feel unsure.
What if I make a mistake with my measurements?
I contact customer support immediately. I explain the error and provide the correct numbers. Many brands allow changes before production starts. I always act quickly to avoid delays.
Are virtual fitting tools reliable?
I find virtual fitting tools helpful for visualizing fit. They give me a good starting point, but I still rely on my own measurements. I use both for the best results.
Do brands use the same size charts?
No, I notice each brand uses its own chart. I always check the specific chart before ordering. I never assume my size stays the same across brands.
How can I make sure my custom jacket matches my style?
I select lapels, buttons, and fabrics that reflect my taste. I review style guides and sample photos. I communicate my preferences during the consultation for a truly personalized look.